Hi There!
I thought I would hop on here for a quick moment to share my re-purposed dresser with you.
This week I have been taking down all the Christmas decor, cleaning and doing some much needed reorganization.
The room first on the to-do list was the craft room. Oh yes….that room looked like a tornado tore through it. It was the gift wrapping room for Christmas, so everyone that needed to wrap a gift, used that room. I had it stocked with a variety of wrapping paper, tape, ribbon, bags and tissue paper.
The room definitely got some use, not to mention all the receipts, bags and trash that was left behind.
I actually filled up a black outdoor trash bag with all that said “trash”….wow!
Ok….off that soapbox and onto the repurposed dresser that I wanted to share with you.
I actually did this project over a year ago, but with the craft room finally organized I can use it for it’s intended use.
I wish I had pics to show what it looked like when I got it.
One of my student’s parents put the dresser out on the curb for trash pick up. On my way into work one morning, I noticed this dresser. When the parents dropped their child off for class, I told them I wanted that dresser, but couldn’t get it until after work,
Easy peasy! The father took it from the curb and placed it on the side of their home until I could get there with the truck. The dresser had seen better days. It was cream with pink designs, the two front doors were about to fall off, and the drawers were not fit for use.
I’m a see the finished product/bigger picture kind of gal, so even though this dresser was ready for the trash, I could see another purpose. God is like that ya know? To others, we may be ready for the trash, but God sees the finished product! I’m so thankful that He sees me in my finished state..:) Free tidbit for you!
Back to the dresser….I removed the hardware, drawers, doors and tossed them out. I lightly sanded the areas that had peeling paint, then used a good quality white paint and gave it a good coat. Once that dried, I gave it another coat of love..I mean white paint.
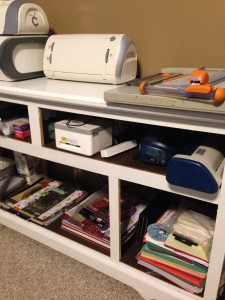
Since I removed the drawers and doors, this created a perfect place for shelves. I measured each area and the great folks at Lowe’s cut the boards for me. I then placed the boards in their compartments and using my electric nailer secured them in place.
All of my Cricut machines, paper, laminating machines, labeler, and cutting boards fit nicely.
Everything is easily accessible and ready to use.
The whole project cost me less than $10.00 to complete! That’s a great deal!!
Thanks for stopping by!
Much Love,
Blondray
Join the party over at:



Leave a Reply